 |

| Realbot by Stefan Hendriks- Readme - Waypointing |
|
Content Introduction Installation Usage Waypointing FAQ Other Stuff Support Realbot Contact Us
 |
Thank you for
downloading the RB: AI Version 1.0!
Waypointing guide for the RealBot: AI Preview Release   Without & with additional properties. The lower part of the waypoint can have several colors; with all different meanings: blue - A counter-terrorist starting waypoint red - A terrorist starting waypoint yellow - A door waypoint light blue - A jump waypoint purple - A ladder waypoint white - A 'normal' waypoint  Ladder waypoint Ok, i really advise you to bind the "waypoint add" command to a key , because we are going to use this one very often! I have bound this command to the "/" key. Now, all we have to do, is to walk from our spawn position to the other spawn position and add waypoints. Be sure that the waypoints we add can reach each other. This means you can make a skeleton of waypoints. This will work, but, as said in the introduction the waypoints are not only navigation points. You should also place waypoints on places where a bot should look when navigating, where it should camp (it will learn this) etc. 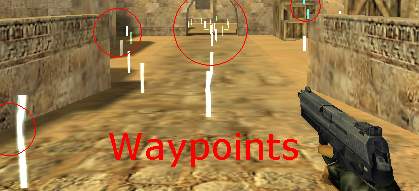 An overview of the waypoints in de_dust Assuming our map is not using any obstacles, like doors , ladders or jumping stuff. We simply walk to all possible places and add a waypoint. Be sure you add waypoints atleast 60 units from each other. This is only for waypoints of the same type. For example, if you have added a waypoint and made it a door waypoint, then you can add a normal waypoint closer to it then 60 units. For your orientation, a player is 72 units high. If you want to know how to handle the obstacles, read section 5. Ok, once done with adding waypoints and such, we should end our session and save all information into a file. Before the bots can use the waypoints, there should be some calculation which connects the waypoints and sets up all paths so the bots know how to get from A to B. This all is arranged by the Precalculation... Bring down the console and type: waypoint end Now, the precalculator will do its work. Depending on your computer speed it will take some time. On my machine it took around 1~2 minutes a map. Huge maps (like militia or siege) took around 3~4 minutes. Please, do not touch anything when running the precalculator! Windows might think that your Half-Life is crashing, but it is NOT. Because the process takes some time , windows thinks the program is dead or something. Once you can move again, and see the message "waypointing done, have fun playing!", you should turn off drawing waypoints, type again: waypoint draw and you wont see the waypoints. Now, you should test the bot with your waypointed map, read section 7 for this! 4. Precalculation: This section will go a bit deeper about the precalculation process. The precalculator will simulate a humans movement through all waypoints. This is for all normal waypoints. When the precalculator encounters a door when going to a door waypoint, it knows its ok! A jump waypoint will let the precalculator know it should try to simulate a simple jump. This check will only be done when the precalculator knows it should jump from a specific waypoint to another waypoint, therefor you should always have 2 jump waypoints for 1 jump! Before starting the precalculations, shoot every breakable object that will probably be broken. For example, in cs_militia, shoot the windows on top of the house. If you don't, bots will think there is a floor and will try to walk over the windows even when they're broken. This entire process takes a while, depending on the computer speed and the amount of waypoints that are placed. Once its done, the RBW is saved and you can simply give the RBW file to any other person and let him copy it into the counter-strike map subfolder of realbot! The location is : <YOUR HL/CS folder>\realbot\cstrike\maps\ 5. Handling Objects: Ok, so the map is not as easy as just walking around? No problem here is the info to get the bots using ladders, doors, jumping and more. LADDERS: Required: 1 ladder waypoint at top, 1 ladder waypoint at bottom 1 normal waypoint close to ladder waypoint at top 1 normal waypoint close to ladder waypoint at bottom Ok, this is not as hard as it seems. To add a ladder waypoint, simply get ON the ladder. Add a waypoint and its a ladder waypoint automaticly. Place 1 waypoint at the bottom and get off the ladder, then get very close to the ladder waypoint but do NOT get on the ladder. Add a waypoint now and the bottom of the ladder is now reachable for a bot. Now, do this the same with the top of a ladder. Be sure that the close normal waypoint is easy reachable. Other waypoints will go from there so do not place a normal waypoint at a place where the bot will fall of the ladder easily! If you do this, bots will get stuck! DOORS: Required: 1 door waypoint in a door 1 normal waypoint at one side of the door waypoint (close!) 1 normal waypoint at the other side of the door waypoint (close!) Ok, simply open the door, and add a waypoint. Then bring down the console and type: waypoint door Ok, it will become yellow now! Now, wait till the door closes. It does not really matter if you can see the yellow waypoint now. Just be sure it is not that far of the door. Now, add a waypoint close to the door waypoint. Be sure that any waypoint connected by the waypoint you add can reach each other. Repeat this for the other side of the door. You will create a gateway this way: M-W-D-W-M -> this will become the situation. (M)Multiple waypoints will be able to reach the (W)Waypoint you added close to the (D)Door. JUMP: Required: 1 Jump waypoint where we should jump to 1 jump waypoint we should jump from NOTE: The jumping code is not that advanced, it is unlikely to work for very complicated jumps! Simply add one waypoint where the bot should jump to. Bring down the console and type: waypoint jump to make it a jump waypoint. Now, move to the position where the bot should jump from to the waypoint we just added. Make this a jump waypoint too. Be sure you can jump from the waypoint to the other waypoint! 6. Adding light values (new): Applying light values is easy and effective. You should use this in order to make RealBot understand that it is in a dark area or not. RealBot uses a light value range from 0 to 255. The higher the value, the brighter the area. Anything above 128 will not get any check and is considered as visible. Anything below a value of 128 will make the bot think about that area when something is moving through it. If you want to make a bot absolutely blind, just set the value to 0 and the bot will not see you at all. The bots vision is based uppon the following rules: - Does the player move? - Does the player shoot? A bot will more likely spot a moving enemy faster then an enemy that is not moving in that same area. When the enemy shoots it will be detected for sure. You do not need to precalculate for light values, you can apply them before or afterwards. However, do mind that in order to save your light values you have to save the info to the waypoint file using the "waypoint save" command. If you set the light values before the precalculations then it should not matter because "waypoint end" already saves for you after precalculations. The following command will let you set or get a light value of the closest waypoint. light set value When not giving any value for this command you will get the current light value, else the given value will be applied. 7. Hints and Tips: When you have very tidy places, like for example for a hallway (a door opening), add one waypoint IN the opening, and add 2 other normal waypoints next to it as if it is a door. This way you ensure the bot knows it can go through it. 8. Testing your map: Once waypointed, you should test the map with one ct bot first. Just add one: rb_addbot 2 I advise you to get into spectator mode and follow this bot for a few minutes. Now, kick the bot: kick "<name of bot>" And add a terrorist bot: rb_addbot 1 And follow this one too! If all looks ok, then you have succesfully waypointed your map. To be 100% sure, fill the server with bots. It should run smoothly, if it does not run as smooth as usual then there some starting locations cannot be reached! Be sure ALL starting locations can reach each other!! The following things can happen when something went wrong: ISSUE: you have some lag , and it dissapears when the bot is dead ISSUE: Bots do not move at all, constantly duck. SOLLUTION: Check ALL starting locations and be sure they all can be reached. Also be sure that all waypoints can reach other and all paths are possible. Add more normal waypoints if you are not sure if something is not reachable. |
Credits Programmed by: Stefan Hendriks Tub Testers: Shivan Greg Slocum and everybody else at the forums Special Thanks: Botman Aspirin Count-Floyd Jean-Pierre |